
 |
||||||||||||||||||||
| 7/31 | ||||||||||||||||||||
|
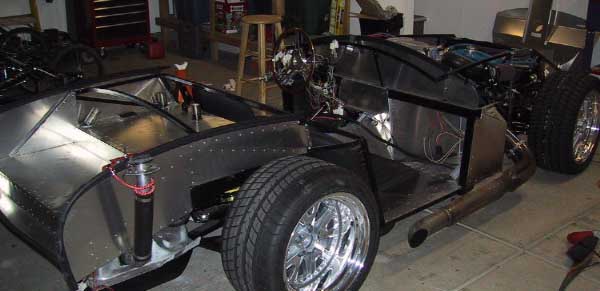
Well, I know it's been a while since I had a chance to update everyone on the progress and some people have requested pictures of the wheels and tires. So lets do some catching up since the last update which was back at the beginning of June. A lot has happened since then. First of all I have just about completed all of the wiring. In fact all of the pruning of the wiring harness is completed and all I have left to do is wire in the relays for Russ' custom steering columb abd blinker setup. Here you can see just how much wiring I removed from the harness. |
||||||||||||||||||||
 |
 |
 |
||||||||||||||||||
| Essentials, Chilton's and Helms schematics | ||||||||||||||||||||
|
For those of you that would like to takle this wiring on your own, The best advice I can give is to prepare yourself with good schematics and a lot of patience. If I had it to do over again I would still do it myself because now I have an intimate understanding of the wiring in my car in case something ever goes wrong or I want to modify/add circuits in the future. It's not for everybody and I understand that Roger Stine does a great job of this for about $350.00 if your looking for a source. Here is a list of the circuits/plugs that I removed from the harness. Another milestone, of course, was finally getting the 4 into 4 headers that I had been waiting for (for 4 months). I have to say that these FFR pipes don't look bad. However, I did have to drill out the holes that match up to the head because, well........frankly they just didn't line up. Here are a couple pics of the uncoated pipes. Looks like I'll have to relocate those fuel line connections.....Can you say FIRE!? |
||||||||||||||||||||
 |
 |
|||||||||||||||||||
|
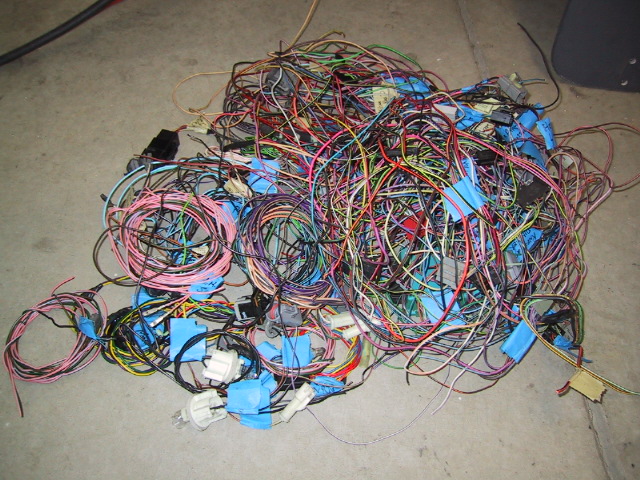
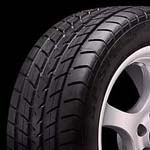
Of course now that the wiring was completed and the headers were on I just had to start the car. Dave Borden came by to help troubleshoot some electrical issues, and after a run to the gas station to get some petrol we fired her up. Oh man this thing is mean with the e-cam Check this out - Audio Something else that was recently completed were the frame modifications necessary to run 315 tires in the rear. I know that this is a personal preference thing, but for me a hot rod such as this just has to have some serious meet on all four corners. Here are my tire and wheel selections: Wheels: Tires: |
||||||||||||||||||||
 |
 |
 |
||||||||||||||||||
|
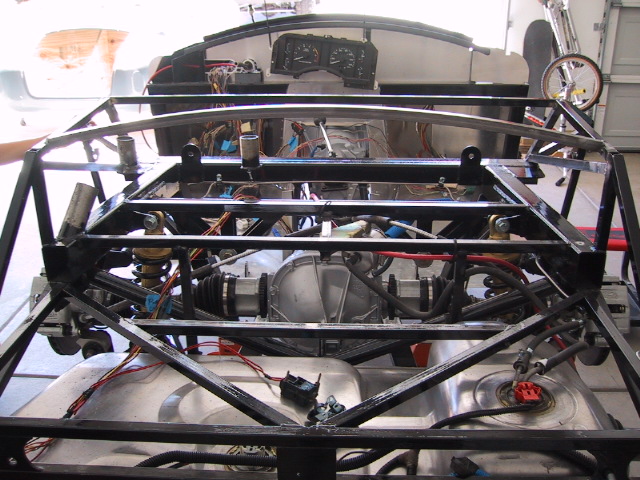
I'll be sure and let everyone know how these tires work out. This is my first experience with Dunlop tires. They look impressive but we'll have to test them out on the skid pad and autocross track before giving an educated evaluation. Back to the frame modifications. Surely those of you out there with Factory Five cars know that these tires just wont fit without making some changes. However, I think you'll be amazed at just how easy these mods are. As you can see here the key it to remove some of the "width" on the large 2X3 which runs accross directly behind the seats. |
||||||||||||||||||||
| Of course if you remove any material from the 2X3, then you also have to relocate the 3/4" tubes which attach at the edges as well. First I determined how far I could go without running into the an obstacle which turned out to be the roll bar mount as seen above. This allowed me to remove about 1-1/2" from bopth sides, which was plenty. This picture will give you an idea of how much material I removed vfrom each side.. | ||||||||||||||||||||
 |
I also ground more off with a die grinder in order to clean up the cut and remove additional material with more precision. I also completely removed all three of the 3/4" tubes which attached to the end of the 2X3 to be replaced with "precision cut" new pieces. These included the diagonal that runs from the middle of the trunk forward, the short downtube from the top down to the 2X3, and the short tube that runs from the door jam to the 2X3. | |||||||||||||||||||
| Here are some photos of the completed modification. | ||||||||||||||||||||
 |
 |
|||||||||||||||||||
 |
||||||||||||||||||||
 |
||||||||||||||||||||
| As you can see, on the drivers side we welded the diagonal tube to the back of the roll bar. This should be a very good spot and allows the aluminum to mount as far in away from the tire as possible. I was really pleased with the way this turned out. So pleased in fact that while I had the welder handy I went ahead and intalled my own trunk hoop based on the line formed by the aluminum which forms the trunk top. Here's a couple good pics.... | ||||||||||||||||||||
 |
 |
|||||||||||||||||||
|
I think that should open up the trunk substantially, don't you? The best part about the whole thing is that I origianally painted the entire frame with POR15. After repainting these areas you can't even tell that the modifications were made. Damn that turned out nice. |
||||||||||||||||||||
 |
Of course once I made these mods to the frame I also needed to make sure the aluminum was going to fit well for the inside of the fender wells. To do this I merely mounted the aluminum with a screw and outlined where the new diagonal tube would be with a marker. Then it was just a matter of bending the peices for the desired fit.. |
|||||||||||||||||||
|
Here's some pictures of each side. -------> They actually fit better than it looks in the pics. |
 |
 |
||||||||||||||||||
|
Well that's about it for the update this week. If you'd like to see pictures of anything specific just send me an emial and I'll see what I can do about getting to it in a timely manner. |
||||||||||||||||||||
| Next Page | ||||||||||||||||||||