Vacuum
Booster Power Brakes for the FFR Cobra
Forrest B. Allen <forrest1@home.com>
While building, from talking to FFR
owners, and watching the Forum postings, I got the impression that a lot of
people are not really happy with the brake pedal force needed with the manual
brakes, and that this gets worse with rear discs. I have IRS, so I decided to
just use the vacuum booster, since it was *free*.
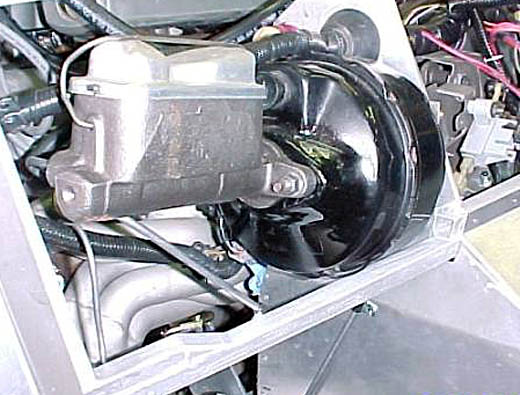
The booster lines up with the pedal
cage, and they fit together just as they did in the
donor, with the front wall of the
driver footbox sandwiched in between. You will need to enlarge the hole for the
little bellows around the vacuum booster rod to the brake pedal. I just used the pedal box as a template to
mark where to cut this out.
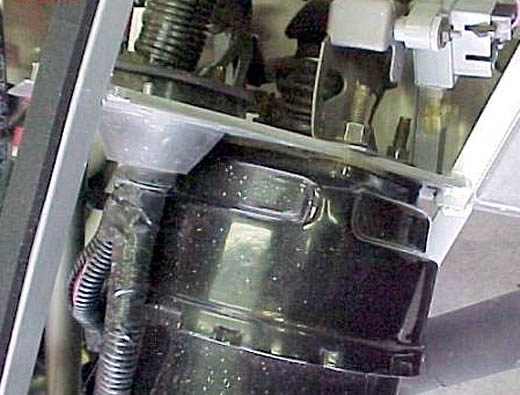
The booster would hit the lower 3/4" frame tube that runs
from the wall of the footbox to the front frame below the upper control arm
mount point, so I cut out a section of the tube and welded back a 3/4"
piece on the lower outside of the original tube, which gives the necessary
clearance.
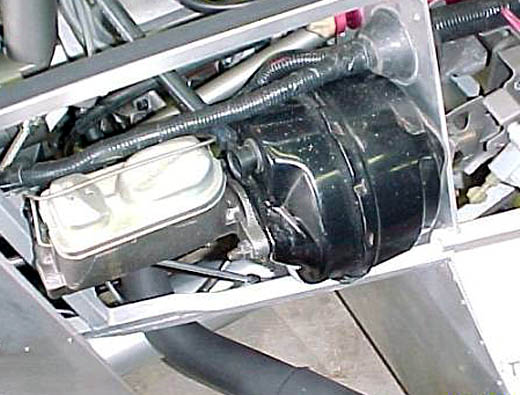
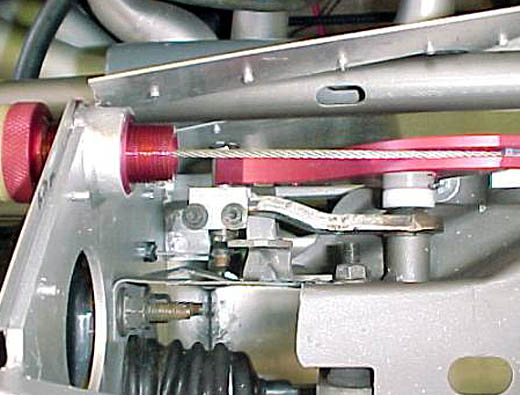
If you look at photo 2 you can see
both ends of the new frame tube where it's overlapped. If I did it again, I
would run the new frame tube all the way down to the front frame "X",
and lengthen the vertical tube (that holds the front pillow block) a little to
meet it. Then it would be very hard to see the modification, because the upper
overlap is hidden inside the drivers footbox. --I did mine after the
"F" aluminum was already on, so I didn't think of that until too
late. I should have drilled out the rivets and removed the “F” panel
temporarily.
The master cylinder will be very close
to the front wheel gravel guard, and the guard will need a “dimple” or just cut
about a 1” hole, like I did. It might
be possible to avoid this with a different (shorter) master cylinder, but it
any case it is not a big problem.
The master cylinder also winds up sort
of under the fender, and will be a little harder to fill, but works. Be careful where you mount your coil and
wiring, or it may be difficult to reach.
I mounted my coil on the firewall, running the high-voltage lead under
the EFI manifold. I shortened the
primary wires to the coil, which come up that harness anyway (credit for this
idea goes to Roger Stine).
I used an '81 Mustang power brake m/c
(Autozone M1764) instead of the donor, because I am running IRS and wanted to
use a Wilwood proportioning valve instead of the donor prop valve. So I wanted
a m/c with separate fluid reservoirs for safety in case of a leak. The donor
has a common reservoir, the donor prop valve is what cuts off a leak at either
end of the system. The '81 m/c measured out at the same depth for the actuating
rod from the booster, so I just bolted it on.
ADDENDUM 26 Oct 2001: I've had some
trouble with insuffiicient rear braking due to using the ’81 m/c, which is a
disk/drum m/c and does not have enough cylinder stroke capacity for the rear
discs. I plan replace it this
weekend--see discussion on this CobraForum thread:
http://www.cobraforum.com/cgi-bin/ultimatebb.cgi?ubb=get_topic&f=1&t=020247
If you are running disc/drum, the
stock m/c and prop valve (modified per Matt90GT) is a good
choice. If you are running disc/disc,
you'll need either a 94-96 GT V6 MC, which has metric (bubble flare) ports,
just like the stock m/c, that will mate with the original lines to the stock
proportioning valve, which must be modified per Matt90GT if you will be using a
Wilwood or other adjustable proportioning valve. Why modify the stock valve?
Here is Matt’s explanation: “Also if you are using the stock 87-93
Mustang combination valve (the block below the MC in the mustang) it contains 2
parts. A shuttle valve accessed via the rear plug (the small one) which will
move over to close if you lose pressure in one brake circuit. This will give
you the other brake circuit with which to stop with. Basically a safety feature
incase of failure or leak. The front part of the combination valve is the stock
proportioning valve. If you want to use the stock combination valve with an
adjustable unit, you HAVE to defeat the stock PV. You do this buy purchasing
FMS M2450-A plug ($7-10 at any FMS dealer). To finish the modification, you
remove the stock endcap (you cannot leave this in because of the rubber plug in
it. That is usually sealed against the rod. remove the rod and then it is
exposed to up to 1000PSI and rotting from the brake fluid), transfer rubber O
ring to the FMS plug, remove the spring, spring seat and rod. Then ONLY install
the FMS Plug. defeats the stock PV and allows you to run an aftermarket
adjustable one. “
Alternatively, you can do as I am
doing, trash the donor proportioning valve,
and use a Wilwood valve for the rear brakes, in which case you will want
to get a 1986 Mustang SVO Turbo 4cyl mc (NM1897 at Autozone, $52.99), which has
SAE inverted-flare threaded ports which will match the pre-flared tubing that
you will probably be using (actually, one port is larger and WILL need an
adapter). It also has separate
reservoirs in the m/c, so if one end of the system leaks, the other end will
not be affected, so the shuttle valve is unnecessary. I like to think that this makes the system simpler and
neater. The depth for the actuating rod
is the same as the other 1990 (stock) m/c, and the ’81 m/c (and maybe all
Fords??), so it just bolts onto the
booster.
See Matt Bobbitt’s (Matt90GT)
excellent sites for more info on brake components. His site is directed at Mustang upgrades, and covers many options
applicable to FFR Roadsters:
My booster is a 1990, straight out of
the donor. I don't know for sure, but I would assume that all Fox body boosters
are the same size—except maybe the cobra models?
After installing this, the only
problem was that the brake and clutch pedals were too close to the driver seat
for my comfort. The pictures show how I
lowered them both to a comfortable level.
The brake is easy, just take out the
pivot bolt and move the pivot around until it looks right, then redrill. This is easy if you have a foot-long drill
bit, as I did, otherwise you might have to take the pedal box out yet
again. Or the pedal lever itself could
be reshaped. Even with the reposition,
the wheels lock long before the pedal would run out of travel.
The clutch is a little more tricky,
involving spacers under the return stop, a cut-and-try sort of deal. The Forte’s quadrant allows easy adjustment
so that there is slight throwout preload and so that the clutch releases
completely, as well as being stronger than the OEM plastic unit.
About the gap between the rear end of
the pedal box and the 3/4" tubes: They ALL fit that way. I did what most
people do and put a stack of washers in there. It's quick and easy, and nobody
is going to see it.
A more elegant solution would be to
rebuild the 3/4" frame, welding it to the TOP edge of the 2x2 firewall
tube, which is how it should come from
the factory in the first place, IMHO. The way to do it would be to
cut out the old tubes, bolt the pedal
box onto the front wall, and then use the pedalbox as a jig to fit the
3/4" tubes to the firewall 2x2.
You'd want to do it before the aluminum is on the firewall and footboxes.]
***My thanks to Sergio for taking
these pictures with his digital camera.
Sergio has also mounted the vacuum booster on his car, see his photo
page for additional pics:
Sergio's
photo page:
http://members4.clubphoto.com/sergio312874/guest-1.phtml
***Larry Cornish installed the booster
before I even though of it:
posted
05-25-2001 11:14 AM
Marc,
I
installed the donor booster this last winter and have about 2,000 miles on it.
We have the IRS with stock discs, no proportioning valve and an '84 M/C. The
M/C is a little harder to fill, but it's not like you do this often anyway. The
splash shield needed a 1" hole for clearance. Our install is exactly as
Forrest's.
It
stops straight and true and is sooooooo much more comfortable.
Larry
Cornish
Member
# 247
Photographs, with thanks to Sergio:

No, it doesn’t touch the ¾ tube, but close!
Note overlap. Upper
end is totally hidden in footbox, lower end hard to see in finished car, but
could be avoided by extending new ¾ tube all the way to the “X”
Shows how the elephant ear will need a hole or dimple for
the corner of the m/c
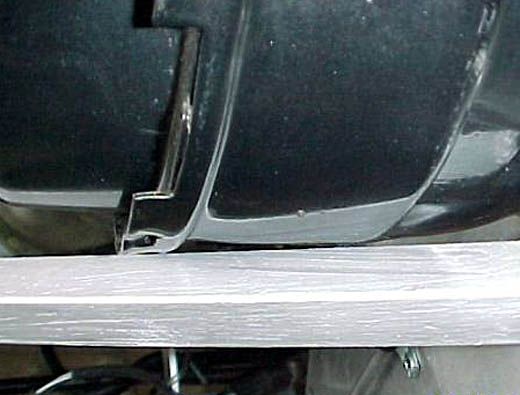
Yes, it is close, but no contact. Note that new bar is offset slightly to outside as well as below
old tube.
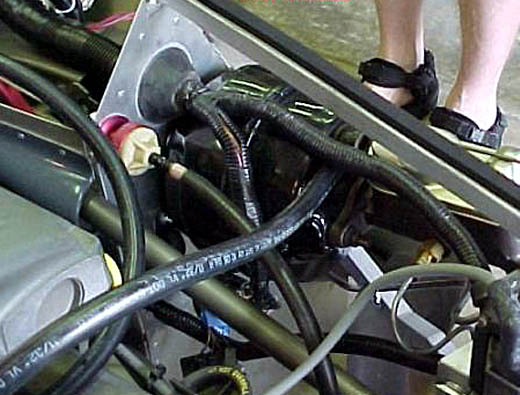
Ignition coil before moving to firewall (it hit the hood
strut in this position)
top view
Top inside, also shows spacer on clutch arm used to adjust
clutch pedal height lower (a cut and try proposition). Forte’s adjustable clutch quadrant allows
easy adjustment for release with reduced pedal travel.
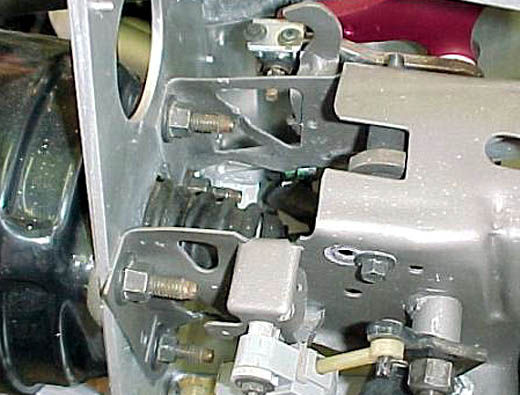
Shows relocation of brake lever pivot bolt, to lower brake
pedal for comfortable driving position.
Clutch pedal is at same level, using spacers to adjust the return
travel. These mods, along with throttle
pedal “de-tuning” as described in the CobraForum, have made this a very
comfortable car to drive.